오늘은 NavMesh Building Component의 두번째 예제를 살펴보려고 합니다.
두번째 예제에는 runtime navmesh build, real-time navmesh build와 관련된 내용이 있습니다.
이게 무슨 내용이냐구요? 예제를 통해서 천천히 알아보도록 합시다.
혹시 NavMesh Building Component를 다운받지 않았으면 아래 링크에서 먼저 다운로드 해주세요.
다운로드 : github.com/Unity-Technologies/NavMeshComponents
Unity-Technologies/NavMeshComponents
High Level API Components for Runtime NavMesh Building - Unity-Technologies/NavMeshComponents
github.com
그리고 scenes폴더의 2_drop_plank.unity를 엽니다.
플레이 버튼을 눌러서 실행을 시켜보니 터치하는 지점으로 에이전트가 이동을 하고,
스페이스를 누르면 에이전트 앞에 널판지가 떨어지네요.
이번 예제는 널판지로 길을 만들어서 동동 떠다니는 큐브를 먹는 간단한 게임입니다.
그럼 이게 어떤 내용인지 하이어라키를 한번 살펴볼게요.
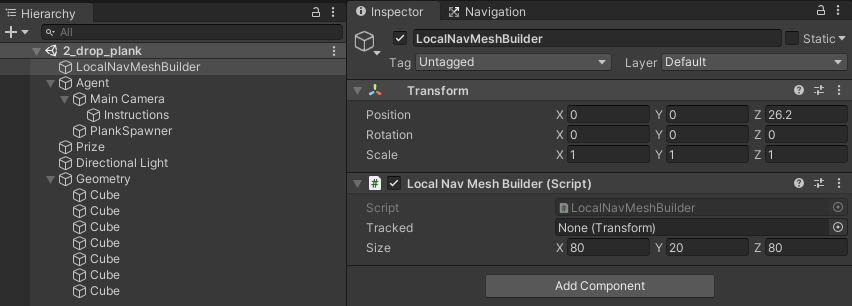
LocalNavMeshBuilder 노드를 보니 LocalNavMeshBuilder Script가 있네요.
이번 예제의 핵심은 이 부분입니다.
또 에디터 모드에서 씬 뷰를 열고 Navigation탭을 눌러보면 NavMesh가 보이지 않는 것으로 보아,
실시간 네비메시 빌드를 하고 있는 것을 알 수 있습니다.

코드는 혹시나해서 간단하게 주석을 달았습니다. 아래 참고해주세요~
LocalNavMeshBuilder.cs
using UnityEngine;
using UnityEngine.AI;
using System.Collections;
using System.Collections.Generic;
using NavMeshBuilder = UnityEngine.AI.NavMeshBuilder;

// Build and update a localized navmesh from the sources marked by NavMeshSourceTag
[DefaultExecutionOrder(-102)]
public class LocalNavMeshBuilder : MonoBehaviour
{
    // The center of the build
    public Transform m_Tracked;

    // The size of the build bounds
    public Vector3 m_Size = new Vector3(80.0f, 20.0f, 80.0f);

    NavMeshData m_NavMesh;
    AsyncOperation m_Operation;
    NavMeshDataInstance m_Instance;

    /// 네비 메시 빌드에 쓰일 Source
    List<NavMeshBuildSource> m_Sources = new List<NavMeshBuildSource>();

    /// <summary>
    /// 시작과 함께 비동기로 네비메시를 계속 업데이트해준다.
    /// </summary>
    /// <returns></returns>
    IEnumerator Start()
    {
        while (true)
        {
            UpdateNavMesh(true);
            yield return m_Operation;
        }
    }

    void OnEnable()
    {
        // Construct and add navmesh
        m_NavMesh = new NavMeshData();
        m_Instance = NavMesh.AddNavMeshData(m_NavMesh);
        if (m_Tracked == null)
            m_Tracked = transform;
        UpdateNavMesh(false);
    }

    void OnDisable()
    {
        // Unload navmesh and clear handle
        m_Instance.Remove();
    }

    /// <summary>
    /// 네비 메시를 동기/비동기로 업데이트한다.
    /// </summary>
    /// <param name="asyncUpdate">비동기 업데이트를 사용할 지 여부</param>
    void UpdateNavMesh(bool asyncUpdate = false)
    {
        NavMeshSourceTag.Collect(ref m_Sources);
        var defaultBuildSettings = NavMesh.GetSettingsByID(0);
        var bounds = QuantizedBounds();

        if (asyncUpdate)
        {
            // 비동기로 네비메시를 업데이트한다.
            m_Operation = NavMeshBuilder.UpdateNavMeshDataAsync(m_NavMesh, defaultBuildSettings, m_Sources, bounds);
        }
        else
        {
            // 해당 프레임에 즉시 네비메시를 업데이트한다.
            NavMeshBuilder.UpdateNavMeshData(m_NavMesh, defaultBuildSettings, m_Sources, bounds);
        }
    }

    /// <summary>
    /// 바운드를 구하기 위한 함수
    /// </summary>
    /// <param name="v"></param>
    /// <param name="quant"></param>
    /// <returns></returns>
    static Vector3 Quantize(Vector3 v, Vector3 quant)
    {
        float x = quant.x * Mathf.Floor(v.x / quant.x);
        float y = quant.y * Mathf.Floor(v.y / quant.y);
        float z = quant.z * Mathf.Floor(v.z / quant.z);
        return new Vector3(x, y, z);
    }

    /// <summary>
    /// 네비메시 빌더의 바운드를 구한다.
    /// </summary>
    /// <returns></returns>
    Bounds QuantizedBounds()
    {
        // Quantize the bounds to update only when theres a 10% change in size
        var center = m_Tracked ? m_Tracked.position : transform.position;
        return new Bounds(Quantize(center, 0.1f * m_Size), m_Size);
    }

    /// <summary>
    /// NavMesh 빌더의 바운드 영역을 그려준다.
    /// </summary>
    void OnDrawGizmosSelected()
    {
        if (m_NavMesh)
        {
            Gizmos.color = Color.green;
            Gizmos.DrawWireCube(m_NavMesh.sourceBounds.center, m_NavMesh.sourceBounds.size);
        }

        Gizmos.color = Color.yellow;
        var bounds = QuantizedBounds();
        Gizmos.DrawWireCube(bounds.center, bounds.size);

        Gizmos.color = Color.green;
        var center = m_Tracked ? m_Tracked.position : transform.position;
        Gizmos.DrawWireCube(center, m_Size);
    }
}
LocalNavMeshBuilder라는 클래스 이름에 맞게 스크립트가 부착된 객체에서부터 m_Size만큼의 영역을 런타임에 네비메시 빌드를 하도록 구현되어있어요.
여기서 눈여겨볼 부분은 네비 메시 업데이트를 하는 부분인데요,
동기 업데이트(해당 프레임에 즉시 업데이트)와
비동기 업데이트(아마도 코루틴으로 비동기 업데이트 동작)으로 나눠져있습니다.
Unity의 기본 NavMesh 시스템에서도 NavMeshAgent나 NavMeshObstacle로 인해서 카빙이 가능하지만 네비메시에 즉시 반영이 되지는 않습니다.
아래 unity document에 보듯이 CPU 오버헤드를 제거하기 위해 next frame update에서 계산이 된다고 되어있습니다.
Logic for moving Nav Mesh Obstacles
Unity treats the Nav Mesh Obstacle as moving when it has moved more than the distance set by the Carve > Move Threshold. When the Nav Mesh Obstacle moves, the carved hole also moves. However, to reduce CPU overhead, the hole is only recalculated when necessary. The result of this calculation is available in the next frame update. The recalculation logic has two options:
- Only carve when the Nav Mesh Obstacle is stationary
- Carve when the Nav Mesh Obstacle has moved
(출처 : docs.unity3d.com/2020.2/Documentation/Manual/class-NavMeshObstacle.html)
Unity - Manual: Nav Mesh Obstacle
Nav Mesh Obstacle The Nav Mesh__ Obstacle__ component allows you to describe moving obstacles that Nav Mesh Agents should avoid while navigating the world (for example, barrels or crates controlled by the physics system). While the obstacle is moving, the
docs.unity3d.com
개발하는 프로젝트에 따라서 원하는 시점에서 즉시 네비메시를 업데이트가 필요한 경우가 있는데요,
NavMeshBuilder에서 해당 기능 수행이 가능합니다.
클래스의 레퍼런스를 찾아 들어가면 아래와 같은 API들을 볼 수 있어요.
Runtime NavMesh Build를 위해서는 아래처럼 하면 됩니다.
1. 네비메시에 필요한 Source를 Collect
2. BuildNavMeshData 혹은 UpdateNavMeshData
NavMeshBuilder.cs
using System.Collections.Generic;
using UnityEngine;
using UnityEngine.AI;
using UnityEngine.Bindings;

namespace UnityEngine.AI
{
    [NativeHeader("Modules/AI/Builder/NavMeshBuilder.bindings.h")]
    [StaticAccessor("NavMeshBuilderBindings", StaticAccessorType.DoubleColon)]
    public static class NavMeshBuilder
    {
        public static NavMeshData BuildNavMeshData(NavMeshBuildSettings buildSettings, List<NavMeshBuildSource> sources, Bounds localBounds, Vector3 position, Quaternion rotation);
        [NativeHeader("Modules/AI/NavMeshManager.h")]
        [NativeMethod("Purge")]
        [StaticAccessor("GetNavMeshManager().GetNavMeshBuildManager()", StaticAccessorType.Arrow)]
        public static void Cancel(NavMeshData data);
        public static void CollectSources(Bounds includedWorldBounds, int includedLayerMask, NavMeshCollectGeometry geometry, int defaultArea, List<NavMeshBuildMarkup> markups, List<NavMeshBuildSource> results);
        public static void CollectSources(Transform root, int includedLayerMask, NavMeshCollectGeometry geometry, int defaultArea, List<NavMeshBuildMarkup> markups, List<NavMeshBuildSource> results);
        public static bool UpdateNavMeshData(NavMeshData data, NavMeshBuildSettings buildSettings, List<NavMeshBuildSource> sources, Bounds localBounds);
        public static AsyncOperation UpdateNavMeshDataAsync(NavMeshData data, NavMeshBuildSettings buildSettings, List<NavMeshBuildSource> sources, Bounds localBounds);
    }
}
오픈 소스가 아니어서 확인이 어렵지만, Sync로 동작하는 UpdateNavMeshData 같은 경우는 호출 직후에 프레임 드랍이 따로 일어나지 않는 것으로 보아서 변경된 부분만 체크해서 빌드를 하도록 구현되어있는듯 합니다.
네비메시 빌드의 Source로 쓰이는 Cube들은 각각 NavMeshSourceTag 스크립트가 붙어있어요.
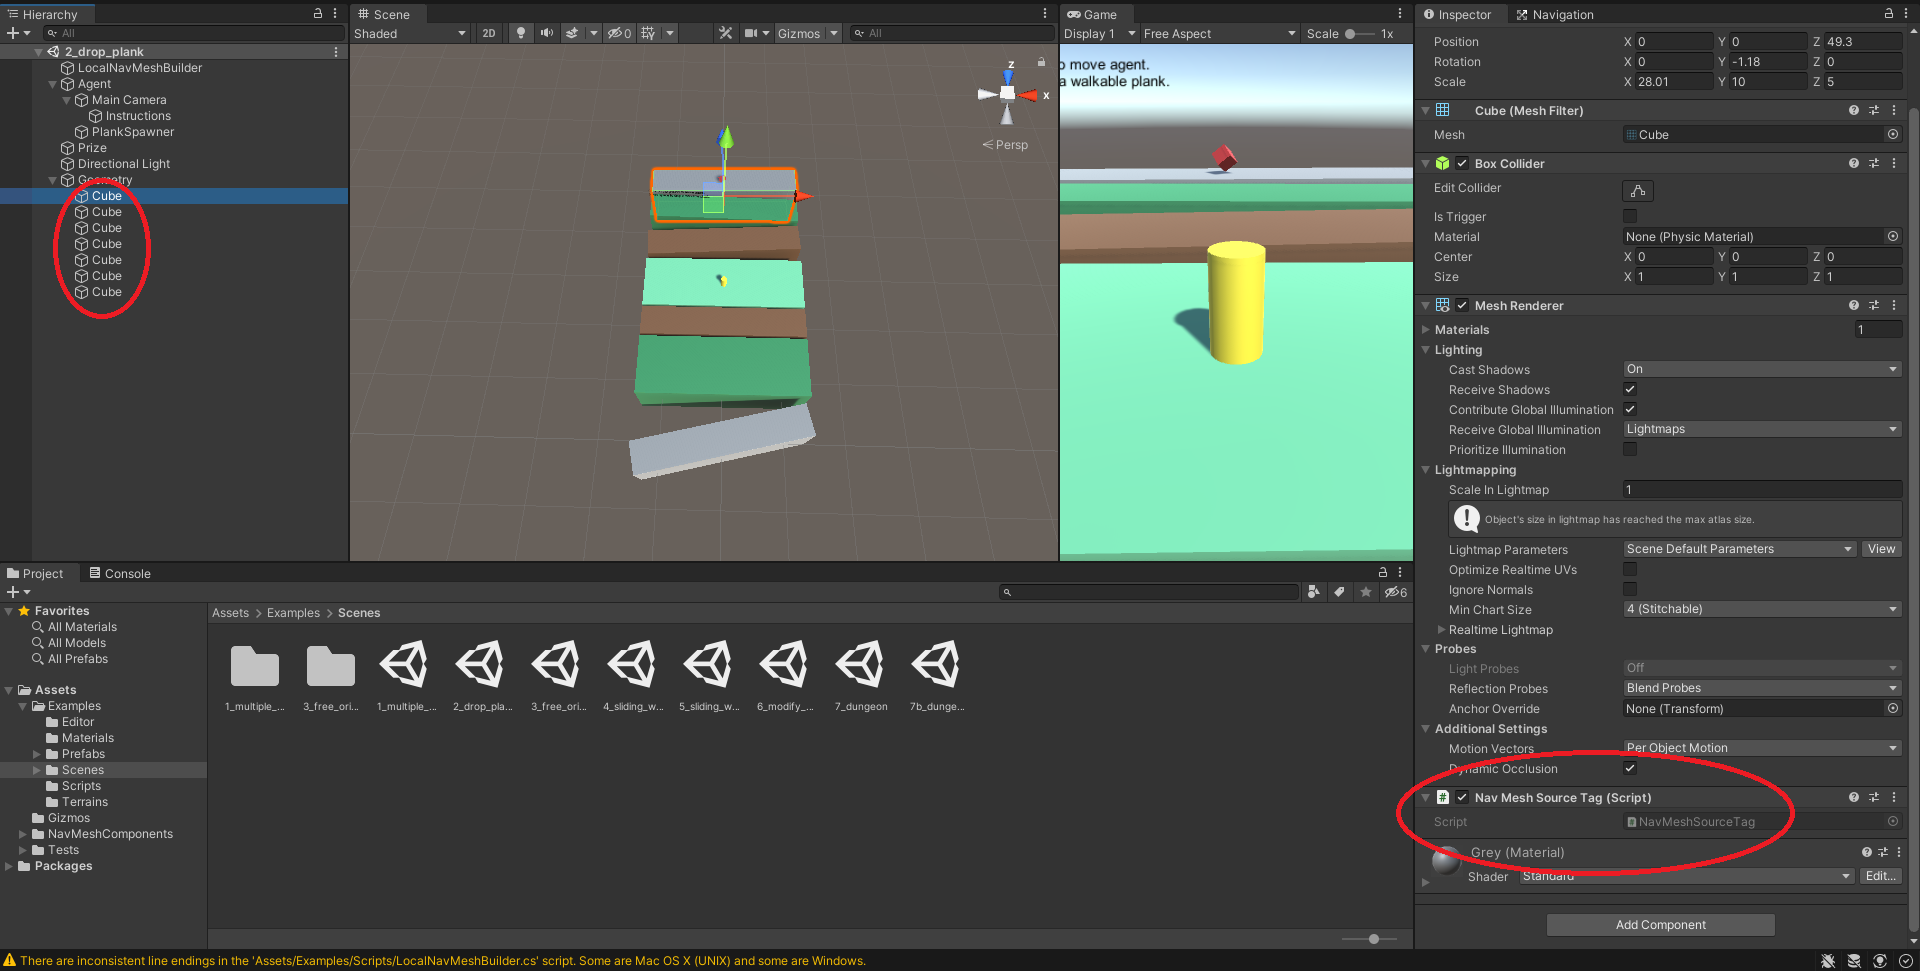
스크립트를 열어보면 Terrain과 NavMeshFilter 컴포넌트가 있으면
NavMeshBuildSource로 변환해서 넘겨주는 역할을 하네요.
NavMeshSourceTag.cs
using UnityEngine;
using UnityEngine.AI;
using System.Collections.Generic;

// Tagging component for use with the LocalNavMeshBuilder
// Supports mesh-filter and terrain - can be extended to physics and/or primitives
[DefaultExecutionOrder(-200)]
public class NavMeshSourceTag : MonoBehaviour
{
    // Global containers for all active mesh/terrain tags
    public static List<MeshFilter> m_Meshes = new List<MeshFilter>();
    public static List<Terrain> m_Terrains = new List<Terrain>();

    void OnEnable()
    {
        var m = GetComponent<MeshFilter>();
        if (m != null)
        {
            m_Meshes.Add(m);
        }

        var t = GetComponent<Terrain>();
        if (t != null)
        {
            m_Terrains.Add(t);
        }
    }

    void OnDisable()
    {
        var m = GetComponent<MeshFilter>();
        if (m != null)
        {
            m_Meshes.Remove(m);
        }

        var t = GetComponent<Terrain>();
        if (t != null)
        {
            m_Terrains.Remove(t);
        }
    }

    // Collect all the navmesh build sources for enabled objects tagged by this component
    public static void Collect(ref List<NavMeshBuildSource> sources)
    {
        sources.Clear();

        for (var i = 0; i < m_Meshes.Count; ++i)
        {
            var mf = m_Meshes[i];
            if (mf == null) continue;

            var m = mf.sharedMesh;
            if (m == null) continue;

            var s = new NavMeshBuildSource();
            s.shape = NavMeshBuildSourceShape.Mesh;
            s.sourceObject = m;
            s.transform = mf.transform.localToWorldMatrix;
            s.area = 0;
            sources.Add(s);
        }

        for (var i = 0; i < m_Terrains.Count; ++i)
        {
            var t = m_Terrains[i];
            if (t == null) continue;

            var s = new NavMeshBuildSource();
            s.shape = NavMeshBuildSourceShape.Terrain;
            s.sourceObject = t.terrainData;
            // Terrain system only supports translation - so we pass translation only to back-end
            s.transform = Matrix4x4.TRS(t.transform.position, Quaternion.identity, Vector3.one);
            s.area = 0;
            sources.Add(s);
        }
    }
}
자 이렇게 두번째 샘플을 살펴봤는데요,
이번 예제의 핵심은 다음과 같습니다.
1. NavMeshBuilder를 통해서 Runtime NavMesh Build(Update)가 가능하다. 비동기도 가능.
2. NavMeshBuilder는 NavMeshBuildSource를 통해서 이루어진다.
3. NavMeshBuilder에 영역을 지정해서 빌드하거나 업데이트하는 것이 가능하다.
씬 뷰랑 게임뷰를 동시에 열고 보면 아래처럼 NavMesh가 업데이트 되고 있는것이 보입니다.
오늘 예제가 어땠을지 모르겠네요. 저에겐 굉장히 필요했던 내용이어서 참 유용하게 잘 사용하고 있습니다.
그럼 저는 다음 예제에서 찾아뵙겠습니다!
'프로그래밍 > 유니티' 카테고리의 다른 글
| Unity NavMesh #6 실시간 네비메시 빌드 3 (0) | 2021.02.22 |
|---|---|
| Unity NavMesh #5 실시간 네비메시 빌드 2 (0) | 2021.02.16 |
| Unity NavMesh #4 Up Vector가 자유로운 NavMesh (0) | 2021.02.15 |
| Unity NavMesh #2 Multiple Agent (0) | 2021.02.03 |
| Unity NavMesh #1 에이전트 장애물 충돌 회피 (0) | 2021.02.02 |


댓글